

ESP8266 WiFi module
ESP8266 module allows to use RemoteXY with microcontroller device for Wi-Fi. Implemented support for all Arduino boards. The source code of GUI can be download for the Arduino IDE and PLProg.
To use the ESP8266 module to select this module in the properties configuration settings.

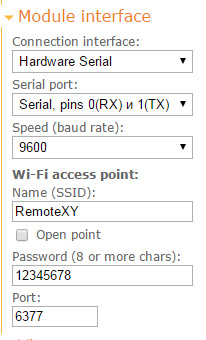
RemoteXY allows to configure module for operate in one of two modes: access point and client. Client allows to connect the module to an existing Wi-Fi access point.
Access point mode of ESP8266 configures the module as an access point and allows to connect Arduino directly to this point. The access point is available to connect to it from smartphone or tablet within a radius of availability of the radio signal. It does not require any other network infrastructure. This connection mode can be used in the far away place where there is no computer networks and the Internet. To configure this mode in the configuration properties of editor need to select the type of connection "Wi-Fi access point."
Client mode of ESP8266 configures the module for automatically connect to an existing Wi-Fi access point, such as a home router or enterprise access point. At the same time connected to the Arduino module ESP8266 must be located in the physical availability of the radio signal of access point. Connecting to the device from smartphone or tablet will be not directly, but through the Ethernet network, an IP address provided by the DHCP server to ESP8266 module. It allows to connect to the Arduino device from anywhere in the local network as well as from the Internet. Connect from the Internet is possible with the correct configuration of the router, such as the use of the virtual server. To configure this mode in the configuration properties of editor need to select the connection type "Ethernet" and select ESP8266 module.
The module is connected to the microcontroller board via serial interface. You can choose to use software serial or hardware serial. Module connection option is selected in the module interface settings of editor. The module is controlled via AT commands.
We recommend using the latest firmware for the ESP8266. Release AT_v0.40 or up. Use the tutorial update firmware of ESP8266.
Power of module can be provided from the DC-DC of Arduino board to 3.3V. Some boards, such as Arduino Nano can not provide sufficient power to output 3.3V, in this case, you need a separate power supply.
Connection via Software Serial
It allows to connect the module to an arbitrary microcontroller pins. The pins used must be select in the module interface settings of editor. Also in the settings must be select the baud rate for serial port. ESP8266 default configured to 115200 baud. To work through SoftwareSerial, must configure the transmission speed ESP8266 to a lower speed. Stable operation of the module is possible at a speed of no more than 19200 baud. To change the speed of module serial interface, must to connect it to the console to the possibility of the AT commands. Module serial interface speed can be changed with the AT command "AT+UART_DEF=19200,8,1,0,0".

There are some limitations on the use of the RX pin for Arduino boards. Limitations associated with do not support to pins interrupt of the microcontroller.
- On Arduino RX doesn't work on pin 13;
- On Mega and Mega2560 only the following can be used for RX: 10, 11, 12, 13, 14, 15, 50, 51, 52, 53, A8(62), A9(63), A10(64), A11(65), A12(66), A13(67), A14(68), A15(69);
- On Leonardo and Micro only the following can be used for RX: 8, 9, 10, 11, 14, 15, 16;
Also, when using SoftwareSerial you should take the following limitations:
- No ability to work at high baud rates. It is not recommended to use a baud rate of more than 19200.
- Some libraries, which also uses interrupt may not work correctly. For example Servo library, the servos will twitch.
Example of ESP8266 module connecting via SoftwareSerial by pins 2(RX) and 3 (TX) on the picture. Please note that you must connect to pins the cross hairs, pin 2(RX) of Arduino to TX of ESP8266 module and pin 3(TX) to the RX pin of module.

Connection via Hardware Serial
It allows to connect the module to the microcontroller pins, supporting one of the hardware serial ports. For different Arduino boards are different ports and contacts. Hardware serial allows to work motule at a maximum connection speed of 115200 baud. The baud rate for Arduino is selected in the module interface settings of editor. ESP8266 must be to pre-configured to work at the same speed as the Arduino. The baud rate setting of module can be made via AT commands. Next Arduino serial ports are available:
- Arduino UNO and Nano: Serial (RX-0, TX-1);
- Arduino MEGA and MEGA2560: Serial (RX-0, TX-1), Serial1 (RX-19 и TX-18), Serial2 (RX-17 и TX-16), Serial3 (RX-15 и TX-14);
>Which port to use, and therefore the pins should be connected to the module, you must select in interface settings of editor. It should also be borne in mind that for Arduino boards Serial port enabled for the microcontroller programming, and if you decide to use this port, you must disconnect the ESP8266 module when programming it. A good solution is to use the boards Arduino MEGA any port other than Serial.
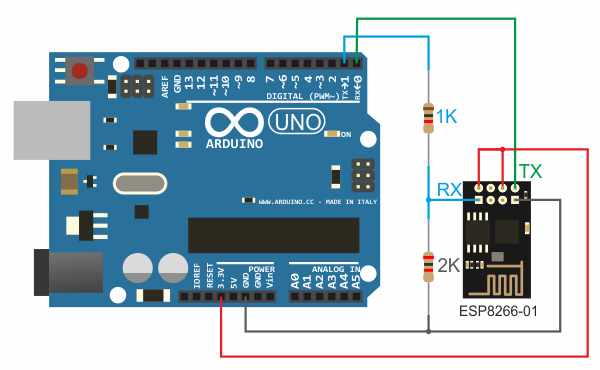
Example of HC-05(06) module connecting via HardwareSerial by pins 0(RX) and 1(TX) on the picture. Please note that you must connect to pins the cross hairs, pin 0(RX) of Arduino to TX of ESP8266 module and pin 1(TX) to the RX pin of module.

 Русский