
Notification
The Notification element is used to send PUSH notifications to the phone. Notifications can be sent over the Internet even if the phone is not connected to the controller.
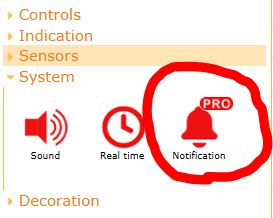
The Notification element is located on the System tab of the left panel in the editor. Click the button icon with the mouse and drag it onto the phone screen. To prevent the element from being displayed, you can hide it using the settings.
Attention. The Notification element is a PRO element. In the free mode, notifications will not be displayed.
Settings
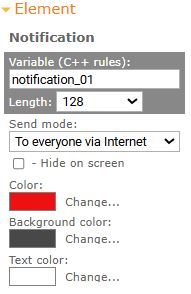
- Variable. Specifies the name of the variable that will be bound to the button. The name must follow the C++ variable naming rules.
- Length. Specifies the size of the buffer for storing notifications. The larger the buffer, the more notifications the controller can store until they are sent. Do not set a buffer size larger than the available RAM on the controller.
- Send mode. Choose the method for sending notifications. Read below to find out which sending method is right for you.
- Hide on screen. Check this box if you do not want the element to be displayed on the screen.
- Color. Color of the element.
- Background color. Color of the circle in which the number of new notifications is displayed.
- Text color. Color used to display the number of new notifications.
Display
In the interface, the notification will be displayed as an icon showing the number of new notifications. You can change the color of this icon or completely hide it from the screen. Clicking on the icon opens the notification history. The notification history can also be accessed via the menu in the top-right corner.

On the phone, if the device supports receiving notifications, a notification icon will appear on the device’s button. Clicking this icon will open the notification history window even if the device is currently not connected.
Data
The variable in the RemoteXY structure is placed in the section of complex variables.
    struct {
        // complex variables
      RemoteXYType_Notification notification_01;
    } RemoteXY;
Operation Description
Text notifications are sent to the application on the phone and appear as regular system notifications.
Notification texts are placed in a buffer and stored there until they are sent using the selected method. The buffer size for storing notifications is specified in the element’s settings in the graphical interface editor. When the buffer overflows, older notifications are deleted to make room for new ones. If a notification text exceeds the buffer size, it will not be sent. Upon restarting the controller, any unsent notifications will be lost.
To send a notification, use the print() and send() commands (see the Methods section below for details). The sending methods work asynchronously — when the method is called, the notification is placed in the buffer. The notification will be sent when the opportunity arises; it may be sent immediately.
Do not send notifications on every controller loop cycle. This will quickly overflow the buffer and you will not get the desired result. Send only notifications that inform about a specific event. Your code must detect events in a way that prevents the same notification from being sent repeatedly.
Attention. Do not send notifications on every controller loop cycle.
Notification sending modes
Notifications are sent depending on the selected Send mode setting.
Only to myself when connected
In this mode, notifications are sent to the phone only when the app is connected to the device. Notifications are transmitted locally without using the Internet. Only the phone that is currently connected to the device will receive the notifications. All notifications still stored in the buffer that have not yet been received will be delivered to the phone.
Use this method when your device does not have Internet access.
To everyone via the Internet
This is the main method for sending notifications when your device is connected to the Internet. The device will send notifications over the Internet. Notifications will be received by all phones that have this device added in the app. The notification will be delivered even if the app is not currently running.
You will not be able to select this sending method if the chosen connection type to the controller does not provide Internet access. See below for the specifics of sending notifications via the Internet.
To everyone via the app when connected
This method is used when your device itself has no Internet access, but notifications will be sent through the app when it connects to the device, using the phone’s Internet connection. Upon connection, all notifications still stored in the buffer that have not yet been sent will be transmitted. Notifications will be received by all phones that have this device added in the app.
This method can be used when your device does not have Internet access on its own but is constantly connected to a phone (e.g., via Bluetooth or USB).
See below for the specifics of sending notifications via the Internet.
Sending notifications via the Internet
When sending notifications over the Internet, the controller must store a unique identifier and key. To ensure these data remain available after a controller reset, they are saved in EEPROM memory. When an Internet-based sending method is selected, the interface editor will generate code that includes the eeprom.h library.
Attention. Unfortunately, boards for which there is no standard eeprom.h library will not be supported.
When the app connects to the controller for the first time, it reads the controller’s identifier and checks it on the server. If the identifier is missing or invalid, the app will send a new identifier and a new key to the controller. If the phone does not have Internet access at that moment, the app will not be able to configure the controller for sending notifications.
The new identifier and key will be saved to EEPROM. After a controller reset, the identifier and key will be restored from EEPROM, allowing the controller to send notifications immediately.
The key is used to encrypt messages. It is generated once and stored only on the controller and on the notification server.
Attention. Notifications are sent no more frequently than once every 5 minutes.
There are restrictions on sending notifications via the Internet. One notification can be sent no more frequently than once every 5 minutes. Send notifications only for important events. If you send multiple notifications at once, the first one will be sent immediately, while the others will be stored in the buffer and sent at 5-minute intervals.
Methods
To send a notification, use the print() method any number of times in any order, then call the send() method.
print (str) - adds text or a value to a new notification. Works the same way as the standard Arduino print() function for the serial port.
println (str) - adds text or a value to a new notification and starts a new line. Works the same way as the standard Arduino println() function for the serial port.
send () - sends the notification. You do not have to call this function explicitly — it is automatically called at the end of each loop cycle.
Code Examples
Sending a notification
    RemoteXY.notification_01.print ("Hello world");
    RemoteXY.notification_01.send ();
Sending a value in a notification
    int temp = calcTemp ();
    RemoteXY.notification_01.print ("Temperature is ");
    RemoteXY.notification_01.print (temp);
    RemoteXY.notification_01.print (" degrees Celsius");
    RemoteXY.notification_01.send ();


 Русский